- Home - Blue Palmetto Home Inspection of Summerville and Charleston
- Learn About Us and This Charleston Home Inspector
- What's Inspected
- Charleston Lowcountry Inspection Areas (geographic)
- Testimonials
- >>>Blogs (educational)
- Sample Reports & Documents
- Why Get a Home Inspection Report
- Charleston's Top Ten Reasons
- Home Inspector Photo Galleries
- Pricing
- Scheduling and Customer Information
- Home Inspection Authorization Contract
- General Scope of Work (electronic)
- Home Inspection Customer Satisfaction Survey
- Privacy Policy
- Full site
- The Roof Framers Field Manual
How to drop a hip rafter.
Submitted by Ray Thornburg on Sat, 12/08/2012 - 19:04

How to Drop a Hip Rafter
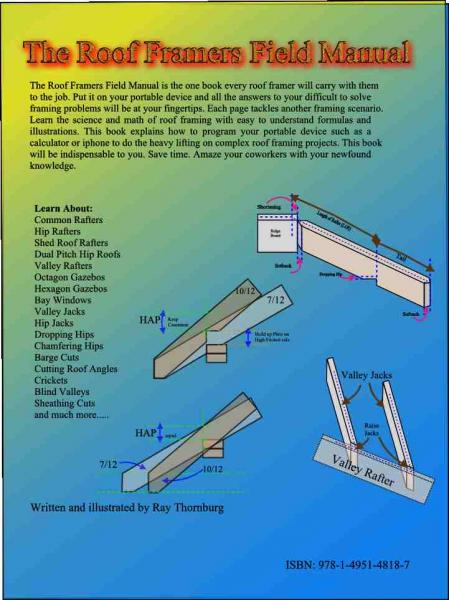
This discussion will explain how much to drop a hip rafter. Let me explain..... a hip rafter rises from the corner of a building at a 45 degree angle and if the carpenters used the same HAP on that rafter as he did the commons the corner of the rafter would rise up above the plane of the roof causing a hump. To stop this the carpenters can either drop the rafter by the proper amount (which is why they call it "dropping the hip") or chamfer the edges to match the incline of the hip. Study the diagram below. Click image to enlarge. But first: Consider buying my book The Roof Framers Field Manual. It helps keep this site up.
 Take the rise of the main roof and multiply it by 1/2 the thickness of the hip. Then divide the answer by 16.97. (framers use 17) multiply that answer by 16 to get sixteenths of an inch.
For example main roof is an 8 in 12, 1/2 rafter thickness is 3/4". 8 x .75 = 6; 6 divided by 16.97 =.3535; .3535 x 16 = 5.65 or 5/16". Now simply measure up from the seat line of the birds mouth 5/16" for the correct drop.
You may wonder why we use 16.97. This is because 16.97 is the diagonal of a 12" square and 12" is the run of the common rafter. Thusly 16.97 (use 17) is the run of the hip.
There is a way to do this without all that math. (in case you left your calculator at home)
The amount of drop is determined by laying a level line anywhere on a hip rafter and measuring 1/2 the thickness of the rafter stock on the level line and then measuring the plumb distance at that point. The seat line is raised this amount so the rafter drops accordingly. Remember on a hip rafter we use 17 to mark the level cut. For example 8/12 on the common rafter but 8/17 on the hip and valleys. Marking the 8 will give you a plumb line; 17 a level line.
Occasionally a hip rafter cannot be dropped (because it is very thick) or part of it needs to be chamfered. In this case measure the distance of the calculated drop at the top edge of the rafter along a plumb line of course. Set your saw to the incline of the hip and rip the beveled chamfer. The incline of the hip is calculated as follows rise divided by 16.97 = TAN; Inverse function of tan on the calculator gives us the incline of the roof. For example 8/16.97 = .471420; press inv tan .471420 and the answer is 25.2401 degrees. Set your saw to 25 degrees and rip the chamfer.
See This Page to learn how to figure the odd unit when laying out the tail of a hip rafter.
There is more discussion on hip rafters at our How to lay out a Hip Rafter page.
If you found this information useful.... Leave a Comment. We'd love to hear from you!
If you want to learn more roof framing secrets buy my book! The Roof Framers Field Manual has it all.
Click the links to be taken to our buy now page!


Comments
Thank you....IDK about your measurement system....we use inches and feet here. So on a 8 in12 roof, the incline of the hip would be 8 in16.97. So the chamfer would be the same as the incline of the hip; which would be 8/16.97 = .471420 which would be the tangent. Now you got to press inv tan .471420 to get 25.2401 degrees or 25 degrees, 14 minutes, 24 seconds. For practical purposes measure up the same as the drop and set your saw to 25 degrees to chamfer the hip.
However if you used a different measurement system I imagine the math would be the same. You would simply substitute when needed. Hope this helps.....Ray
"My question is do you think it feasible to keep the Valley Jack rafters flush with the corner top edge of the Valley Rafter?"
If I understand your question the answer would be no. The valley jacks have to plane to the center of the valley rafter so they are raised up the same amount as the hip drop. For 2" thick lumber there is no real practical reason to make it any more complicated than that. Now if the valley was as wide as 6 inches for instance then it might be worth calculating and ripping a wedge piece to fill in but even then I doubt it would be worth your time. However it (the filler piece) would be the same as if you were chamfering the hip if you so desired to get fancy. Like I said though I'm not completely sure if this was what you were asking but I hope it helps....
The valley rafter is not dropped but any rafters (valley jacks) which are nailed to the valley have to be raised the same amount as the drop so the top of the rafter will plane out with the center of the valley. Hip rafters and Valley rafters are laid out the same way....only hip rafters are dropped....Hope this helps....